
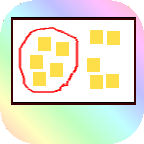
You can write something on the sticky as soon as you want to write. Arrange sticky notes freely by dragging. For the TODO management or the brainstorming.
For everyone who think something.
Feature
- Write immediately!
Since it is handwritten, it is unnecessary to enter time for smartphones and tablets such as flicks.
Because it is handwritten, you can not take a break in character conversion, such as misconversion! (Especially multi-byte language, like Japanese and Chinese)
Because it is handwritten freely any pictures and symbols!
Because it is handwritten, the thought is put in, it tends to remain in memory!
You can choose from twenty-five combinations of sticky notes and pen colors for easy viewing! - Write as much!
Up to memory capacity, write without worrying about the number of stickey notes! You can start over again! - Write anytime!
If you have smartphones and tablets you always carry around, you do not need pen sticky notes! - Easy to organize!
Position of sticky note can be placed freely by dragging!
By grouping together you can move the same group at once!
Google Play URL

Getting Started
There are two ways to start this application. When installing the application, the following two will be added to the launcher.

The icon on the left is what you use when writing sticky notes. The icon on the right will be what you use to organize and view stickey notes.
Tutorial
When you run thins app first time, dialog displays. Please confirm and agree it to go next step.
Run this app.
Choose ‘NEW’

Input board name what you want.
Board screen is here. Tap icon of pen.
Stickey screen is here. Write words or image, and tap ‘Send to Board’ button.
Then press back key to go back board screen.
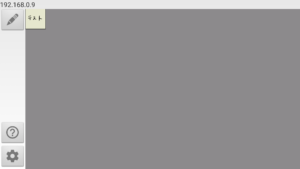
Your stickey is on board now.
You can move anywhere by draging your sticky.
Just do the same thing as before.
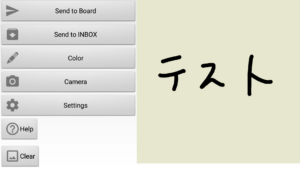
Sticky screen
It is a screen to write a sticky note. Please trace the area of the bottom square with your finger or pen and write freely.
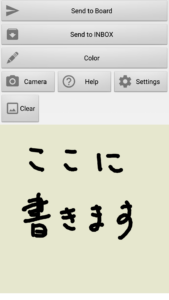
“Send to Board”: It will send the written sticky note to the board which is activated with the IP address set on the setting screen. If the IP address is not set, it will be sent to the board running on that terminal. An error occurs if the board is not running.
“Send to INBOX”: Send the written sticky note to the INBOX board set on the setting screen. If not set, send it to the board named INBOX.
“Color”: Opens the color selection screen.
“Camera”: Launch the screen for creating sticky notes from the camera image.
“Help”: Usage is displayed (this screen).
“Settings”: Open the setting screen.
“Clear”: Erase what you wrote on the sticky note.
Board selection screen
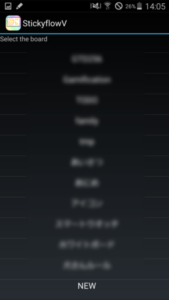
You can choose the board to which the sticky notes will be posted. At first there is only “NEW”. After selecting “NEW”, by pasting a name and sticky note, the board name will be displayed on this screen after that.
Holding down the board name will display a dialog asking if you want to delete the board.
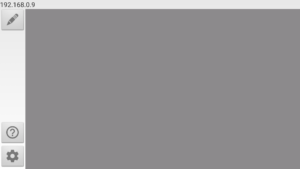
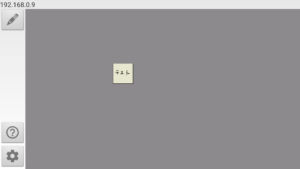
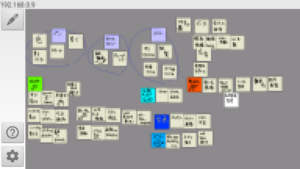
Board screen
It is a screen that allows you to place tags freely. You can move by dragging a sticky note. Dragging it so that it surrounds the sticky note will create the group. You can move by group by dragging in the enclosed area. You can also overlap tags of the same group by quickly tap (double tap) the tag inside the group twice. Double tap the overlapped sticky note to expand it. If you press and hold within the group (press), a dialog to delete the group appears.
You can also expand it by spreading it with two fingers, and shrink it by narrowing it. You can change the display position by moving it horizontally or vertically with two fingers.
The red one will be displayed at the right end while moving the sticky note. The sticky note is deleted when moving the sticky note there.
 Description of the icon on the left side of the screen
“Pen” icon: Launch screen for writing sticky notes
“?”: Usage is displayed (this screen).
“Gear” icon: Opens the setting screen.
Numbers on the upper left of the screen: When using wireless LAN, the IP address is displayed. If you enter this number on a sticky note setting screen with a different terminal, when you “Send to Board” on that terminal, a tag is sent to this terminal.
Color selection screen
It is the screen to set the thickness of the pen and the color of pen and sticky note.
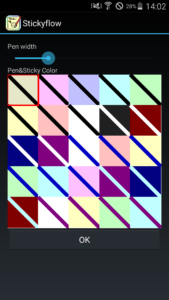
Pen Width: Select the thickness of the pen. Since the thickness of the line can be confirmed on the screen below, please choose the thickness of your choice.
Pen & Sticky Color: Select a combination of pen color and sticky note from 25 types.
OK: After selecting, please press OK button to confirm.
Sticky note setting screen

IP Address: This is the destination when you pressed the “Send to Board” button. If there are multiple smartphones or tablets in the home wireless LAN etc., you can send the sticky notes via wireless LAN. If you do not enter anything, it will be your terminal.
INBOX board’s name: This is the name of the destination board when you pressed the “Send to INBOX” button. It is recommended that you specify boards that you would like to paste tags, such as boards for TODO management. If nothing is entered it will be named INBOX.
size of sticky: Sets the width (pixels) of the sticky note you are sending. If nothing is entered it will be 256 pixels. Increasing this value will make the image clearer, but the process will be heavy.
Board setting screen
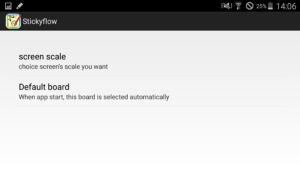
screen scale: Specify the scale. If the scale is small, you can display many sticky notes on one screen, but one sticky note gets smaller.
Default board: If you specify it, if it is activated with the following icon, it starts up with the specified board name selected instead of the board selection screen. It is recommended to specify boards to be browsed frequently, such as TODO management boards.